
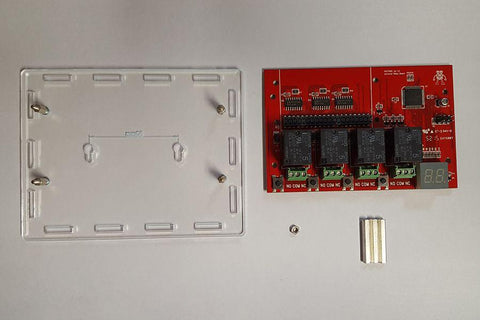
ModMyPi Case for PiOT Relay Board for Raspberry Pi
This is the acrylic case that has been designed for the ModMyPi PiOT Relay Board. The good news is that this case can accommodate the Relay Board and the Raspberry Pi Board together. Relay Boards are known for high voltage and you need to be very careful when using them. This case comes with sleeved-grommets (rubber shields) for added protection. There are cutouts for connectors and interfaces on the Raspberry Pi Board and Relay Board.
Features of Case for ModMyPi PiOT Relay Board + Raspberry Pi
- Brand: ModMyPi
- Compatible with ModMyPi PiOT Relay Board
- Supports Raspberry Pi 3B+, Raspberry Pi 3, Raspberry Pi B, and Raspberry Pi 2
- Contains a GPIO Slot
- 4x Rubber Shields (Sleeved-Grommets
- 1x 40-Pin GPIO Ribbon Cable
- M3 Mounting Points
- Matte-Black sides and Transparent Top
- Convenient access to Raspberry Pi and PiOT Relay Board connectors and interfaces
How to assemble Case for ModMyPi PiOT Relay Board + Raspberry Pi?
This Case for ModMyPi PiOT Relay Board is made of acrylic which is a stiff material so you need to take care and avoid exerting extra pressure. If a scratch appears, DO NOT use a cleanser. The best method is to use a mild mixture of dish detergent and warm water. Do not use a corrosive cloth to dry it, rather wait for some time to let it dry itself.
Let us first have a look at the list of accessories and components you need to set up the Case for ModMyPi PiOT Relay Board.

- 12x M2.5 Nylon Nuts
- 4x M2.5 Nylon Spacers
- 2x M2.5 Nuts
- 8x M2.5 Screws
- 4x Rubber Shields (Sleeved-Grommets)
- 7x Acrylic Plates
- 4x M/F M2.5 8mm Standoffs
- 3x F/F M2.5 25mm Standoffs
- 3x M/F M2.5 25mm Standoffs
The Acrylic plates on the case for ModMyPi PiOT Relay Board have adhesive film coating which needs to remove first of all. After that, you need to follow the steps below by carefully looking at the images.
Step 1. Use the 8mm standoffs on the bottom plate and fix the standoffs with the help of M2.5 screws


Step 2. After fixing the 8mm standoffs, pick up the Relay Board and place it over the standoffs. Once done, secure the structure with the help of 3x M2.5 25mm F/F standoffs. Make sure to use the nut adjacent to the GPIO header on the top-left corner.

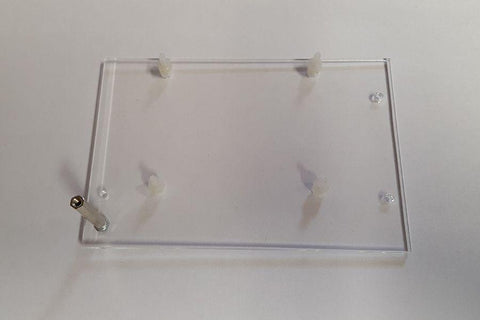
Step 3. Now pick up the Nylon Screws and fix them to the mounting holes. Then use 2 nylon nuts to secure each nylon screw.


Step 4. Have a look at the mounting hole (on the left-side) at the bottom. You will have to use 1x M/F M2.5 25mm Standoff.

Step 5. Now you need to connect the 40-Pin GPIO Ribbon Cable. You have 2 options here. Either use the shrouded box header or the dual-row pin header. Insert into the GPIO Socket on PiOT Relay Board. After that, you need to plug 40-Pin GPIO Ribbon Cable into the box header or pin-header.


Step 6. You place the center acrylic plate over the standoffs. Secure the assembly by using 2x 25mm M/F M2.5 Standoffs. Then use M2.5 screw on the bottom mount you see on the left side.


Step 7. It is time to fix the Raspberry Pi Board. Pick it up and place it over the nylon screws you have already secured fixed to the acrylic plate. Use the nylon nuts to secure the Raspberry Pi board.


Step 8. Connect the 40-Pin GPIO Ribbon Cable to the Raspberry Pi SBC.

Step 9. There are rubber shields (Sleeved Grommets. You need to slide them all one after the other into the relay shield. Insert them from the backside of the relay board.


Step 10. Insert the acrylic plates one by one.


Step 11. Use screws to secure the acrylic plates.
